Preparation of a Standard Solution
Practical Skills: Standard Solutions for Cambridge International A Level Chemistry: prepare a standard solution of sulfamic acid, H₂NSO₃H, by weighing by difference and making up to 250.0 cm³, then titrate it against sodium hydroxide with methyl orange. Method with reasons, corrected sample data, worked calculation to 0.0796 mol dm⁻³, percentage uncertainties and the errors that push the answer high or low.
GCSE Recap: Acids, Alkalis and Titrations
Four quick questions on the GCSE ideas this practical builds on: neutralisation, what a titration measures, which apparatus measures a fixed volume and how concentration is calculated.
What This Practical Is Testing
Practical Skills: Standard Solutions has two connected parts. First you make a standard solution of sulfamic acid, H₂NSO₃H (also written H₃NSO₃): a solution whose concentration is known accurately because it was made from a weighed mass of a pure solid in a known volume.
Then you use that acid in an acid-base titration to find the concentration of a sodium hydroxide solution.
The chain of reasoning is:
| Starting point | What it gives |
|---|---|
| mass of solid | moles of acid |
| the 250.0 cm³ volumetric flask | the acid concentration |
| the titre | the moles of acid that react with 25.0 cm³ of alkali |
| the equation | the moles of alkali |
| the pipette volume | its concentration (the alkali) |
The relative formula mass is needed at the first step, and students lose marks by copying a wrong value: Mr(H₂NSO₃H) = 3 × 1.0 + 14.0 + 32.1 + 3 × 16.0 = 97.1. Sulfamic acid is monoprotic, so one mole of acid neutralises one mole of sodium hydroxide:
H₂NSO₃H(aq) + NaOH(aq) → H₂NSO₃Na(aq) + H₂O(l)
A solid that can be weighed out to make a standard solution directly is a primary standard.
It must be available in high purity, stable in air (not hygroscopic or deliquescent, and not reacting with carbon dioxide), soluble in water, and have a reasonably high Mr so that weighing errors are a small fraction of the mass.
Sulfamic acid meets all of these, which is why it is chosen.
Sodium hydroxide fails the test: the pellets absorb water and carbon dioxide from the air while they sit on the balance, so their mass never gives their moles. Its concentration has to be found by titration against a primary standard instead.
The skills are examined in Paper 3, a timed laboratory examination that assesses manipulation, observation, presentation of data, analysis and evaluation.
On this practical that means being able to describe weighing by difference, the transfer with washings, the volumetric flask technique, the titration technique, and the choice of indicator and its colour change.
It also means the treatment of titres, the calculation to 3 significant figures and the percentage uncertainty of each measurement.
In the timed practical paper the titration solutions are usually supplied ready made, so the weighing steps below are most often examined in the planning paper, while the titration, results table and evaluation are examined at the bench.
Key idea: A standard solution is made from a primary standard: pure, stable, weighable. Every rinse, reading and volume in this practical feeds straight into the final concentration, so every technique point has a calculation consequence.
Check: Choosing a Primary Standard
Decide which solids could be weighed out to make a standard solution, and why the others cannot.
Safety and Apparatus
Sulfamic acid is an irritant to the skin and eyes. Sodium hydroxide at about 0.1 mol dm⁻³ is also an irritant (it is classed as corrosive above about 0.5 mol dm⁻³).
Wear eye protection throughout, avoid skin contact with both solutions and wash any spill off the skin with plenty of water.
Fill the burette below eye level using a small funnel so that acid cannot splash into your face, and remove the funnel before taking a reading. Clamp the burette firmly: a full burette in a loose clamp can tip and shatter.
| Apparatus | What it is for | Precision |
|---|---|---|
| Balance reading to 0.01 g | Weighing the sulfamic acid by difference | ±0.005 g on each reading, so ±0.01 g on the mass used |
| Weighing bottle (or small beaker) | Holding the solid on the balance and while it is tipped out | Reweighed with any residue |
| 250 cm³ beaker and glass rod | Dissolving the solid in about 100 cm³ of distilled water | Volume is approximate at this stage |
| Funnel, wash bottle of distilled water | Transferring the solution and every washing into the flask | Rinsing loses no solute |
| 250 cm³ volumetric flask | Making the solution up to exactly 250.0 cm³ | ±0.15 cm³ (class A) or ±0.30 cm³ (class B) |
| Dropping pipette | Adding the last drops of water to the mark | Prevents overshooting |
| 50 cm³ burette, clamp and stand | Delivering the sulfamic acid solution and measuring the titre | ±0.05 cm³ on each reading, recorded to 0.05 cm³ |
| 25.0 cm³ volumetric pipette and filler | Measuring the sodium hydroxide into the conical flask | ±0.06 cm³ |
| 250 cm³ conical flask on a white tile | Holding the alkali and indicator; the tile shows the colour change | Swirled, not stirred |
| Methyl orange | Indicator: yellow in the alkali, orange at the end point | 2 to 3 drops only |
Exam wording: Hazard questions want the classification and the precaution together: “sulfamic acid is an irritant, so wear eye protection and wash spills off the skin with water”.
A hazard is not the same as a risk: the hazard is the property, the risk is the chance of harm in this procedure.
Method: Step by Step
The method has nine steps. Each one carries its reason, because the reasons are what the mark scheme rewards: “rinse the beaker” scores nothing on its own, “rinse the beaker so that all of the acid reaches the flask” scores the mark.
| Step | What you do | Why |
|---|---|---|
| 1 Weigh by difference | Put about 2.5 g of sulfamic acid into a weighing bottle and record the mass of bottle plus acid, m₁. Tip the acid into a 250 cm³ beaker and reweigh the bottle with any residue, m₂. Mass used = m₁ − m₂. | The mass that actually reached the beaker is what is recorded, so grains left in the bottle do not matter. About 2.5 g in 250 cm³ gives a concentration close to 0.1 mol dm⁻³, a good match to the alkali. |
| 2 Dissolve | Add about 100 cm³ of distilled water and stir with a glass rod until all the solid has dissolved. If the beaker was warmed, let it cool to room temperature. | Undissolved solid cannot be transferred as solution. A warm solution contracts on cooling, so a flask filled warm would end below the mark. |
| 3 Transfer with washings | Pour the solution through a funnel into a 250 cm³ volumetric flask. Rinse the beaker, the glass rod and the funnel with distilled water from a wash bottle and add every rinsing to the flask. | Every mole of acid weighed out must end up in the flask, otherwise the calculated concentration is higher than the real one. |
| 4 Make up to the mark | Add distilled water until the level is about 1 cm below the line, then add the last drops with a dropping pipette until the bottom of the meniscus sits exactly on the calibration line, viewed at eye level. | The flask is calibrated to contain 250.0 cm³ at 20 °C when filled to the line. Reading at eye level avoids parallax error. |
| 5 Mix | Stopper the flask and invert it about ten times. | The concentration must be the same in every part of the solution, or different portions run from the burette would have different concentrations. |
| 6 Prepare the burette | Rinse the burette with a little of the sulfamic acid solution and drain it. Fill it through a funnel below eye level, remove the funnel, open the tap to fill the jet, and read the initial volume from the bottom of the meniscus. | Water left in the burette would dilute the acid. A drip from the funnel would change the initial reading, and an air bubble in the jet would count as acid delivered and make the titre too large. |
| 7 Pipette the alkali | Rinse a 25.0 cm³ volumetric pipette with the sodium hydroxide solution, then use a pipette filler to draw the alkali up to the line and run 25.0 cm³ into a clean conical flask, touching the tip on the inside of the flask. Do not blow out the last drop. | Water in the pipette would dilute the alkali and reduce the moles transferred. The pipette is calibrated to deliver 25.0 cm³ with the last drop left in the tip. |
| 8 Titrate | Add 2 to 3 drops of methyl orange (the flask turns yellow) and stand it on a white tile. Do a rough titration quickly, then repeat adding the acid dropwise near the end point with constant swirling until the first permanent orange colour. Rinse the sides of the flask with distilled water near the end point. Record the final reading to 0.05 cm³. | The rough titre shows where the end point is so that accurate titrations can be run dropwise. Swirling mixes the acid in; washing the sides returns splashed alkali to the reaction. Extra water in the flask does not change the moles of alkali. |
| 9 Repeat | Repeat until two accurate titres are concordant, within 0.10 cm³ of each other, and average only those. | Concordant titres show the end point has been judged consistently; the rough titre is never included in the mean. |
Technique point: Rinse each piece of glassware with the solution it will hold: burette with the acid, pipette with the alkali. Rinse with distilled water only where extra water does not matter: the conical flask and the volumetric flask before use.
Standard Solution and Titration
Make a 250 cm³ standard solution of sulfamic acid, H₂NSO₃H, by weighing by difference, then titrate it against sodium hydroxide to find the concentration of the alkali.
© Dr. Mohammed Al-Fatah – onlinelearningsystem.net
Check: Order the Method
Put the steps of a standard-solution preparation in a workable order for a different solid.
Preparing the Standard Solution: Sample Data
Weighing by difference gives the mass that really reached the beaker.
In the sample run the weighing bottle plus sulfamic acid read m₁ = 14.86 g; after the solid had been tipped into the beaker the bottle plus residue read m₂ = 12.45 g.
Mass of sulfamic acid used = 14.86 − 12.45 = 2.41 g.
Common mistake: Students lose marks by weighing the bottle empty first and then assuming every grain was transferred: the residue left behind is exactly what the m₁ − m₂ method allows for.
The solid was dissolved in about 100 cm³ of distilled water, transferred with washings and made up to 250.0 cm³. Two sums follow, and they are the first two steps of the full calculation later on the page:
n(H₂NSO₃H) = m ÷ Mr = 2.41 g ÷ 97.1 g mol⁻¹ = 0.02482 mol (carry the unrounded value)
c(H₂NSO₃H) = n ÷ V = 0.02482 mol ÷ 0.2500 dm³ = 0.0993 mol dm⁻³ (3 s.f.)
Notice that the volume is written in dm³ before it is used: 250.0 cm³ ÷ 1000 = 0.2500 dm³. If the rounded 0.0248 mol were divided by 0.250 dm³ the answer would come out as 0.0992 mol dm⁻³, so keep one extra figure until the final answer and round once.
| Technique | Why it is done | What goes wrong if it is skipped |
|---|---|---|
| Reweigh the bottle with its residue | Records the mass actually transferred | Assuming the full mass was transferred gives too many moles, so the calculated acid concentration is too high |
| Rinse the beaker, rod and funnel into the flask | Every mole of acid weighed out reaches the flask | Lost acid means fewer moles in the flask; the real concentration is lower than the calculated one, so the titre is larger and the calculated alkali concentration is too high |
| Make up to the mark exactly | Fixes the volume at 250.0 cm³, the value used in the calculation | Filling above the mark dilutes the acid, but the student still uses 250.0 cm³, so the calculated acid concentration is too high and so is the calculated alkali concentration |
| Invert the flask about ten times | Makes the concentration uniform | Poorly mixed solution gives titres that do not agree |
Exam focus: A lost washing and an overfilled flask have the same direction of error: the acid in the flask is weaker than the calculation assumes, the titre gets bigger, and the alkali concentration comes out too high. Say which value is wrong and in which direction.
Diluting a Supplied Solution and Presenting Results
In the timed practical paper the solutions, labelled FA 1, FA 2 and so on, are normally supplied, and the volumetric flask is used for a dilution rather than for dissolving a weighed solid.
The technique is the same from step 3 onwards: pipette 25.0 cm³ of the supplied solution into the flask, make up to the mark with distilled water, stopper and invert.
A 25.0 cm³ portion made up to 250.0 cm³ is diluted by a factor of 250.0 ÷ 25.0 = 10, so a supplied acid of 1.00 mol dm⁻³ becomes 0.100 mol dm⁻³.
Key idea: The moles of solute are unchanged by dilution; only the volume changes, so c₁V₁ = c₂V₂.
The results table carries marks of its own. Use the standard headings, each with its unit written once, in the form “final burette reading / cm³”, “initial burette reading / cm³” and “titre / cm³”.
Record every burette reading to 0.05 cm³ (so 24.30, never 24.3), label the rough titration clearly, tick the accurate titres you use, and quote the mean to 2 d.p.
The evaluation questions then ask for the percentage error in a named reading using the apparatus uncertainties given on the page below.
Exam wording: Dilution: “the number of moles does not change, so c₁V₁ = c₂V₂; 25.0 cm³ of 1.00 mol dm⁻³ made up to 250.0 cm³ gives 0.100 mol dm⁻³”. Give the dilution factor and the new concentration.
Using the Volumetric Flask Correctly
A volumetric flask has a single calibration line on its narrow neck. It is calibrated to contain 250.0 cm³ at 20 °C when the bottom of the meniscus sits exactly on that line.
The narrow neck is what makes it precise, because a small error in height is a very small error in volume.
A 250 cm³ measuring cylinder, by contrast, has an uncertainty of about ±1 cm³ or more, which is why it is never used to make a standard solution.
Fill to about 1 cm below the line with the wash bottle, then finish with a dropping pipette so that you cannot overshoot.
Read the mark with your eye level with the line: looking down on it makes the meniscus appear too high and causes parallax error.
If the level does go above the line the solution must be thrown away and the preparation started again, because there is no way of knowing how much extra water was added.
Never heat a volumetric flask or pour a warm solution into it. The reason is the liquid, not the glass.
A warm solution contracts as it cools, so a flask filled to the line while warm ends up below the line at 20 °C, the volume is less than 250.0 cm³ and the concentration is higher than the calculation says.
Glass expansion is a much smaller effect. Cool the beaker to room temperature before transferring.
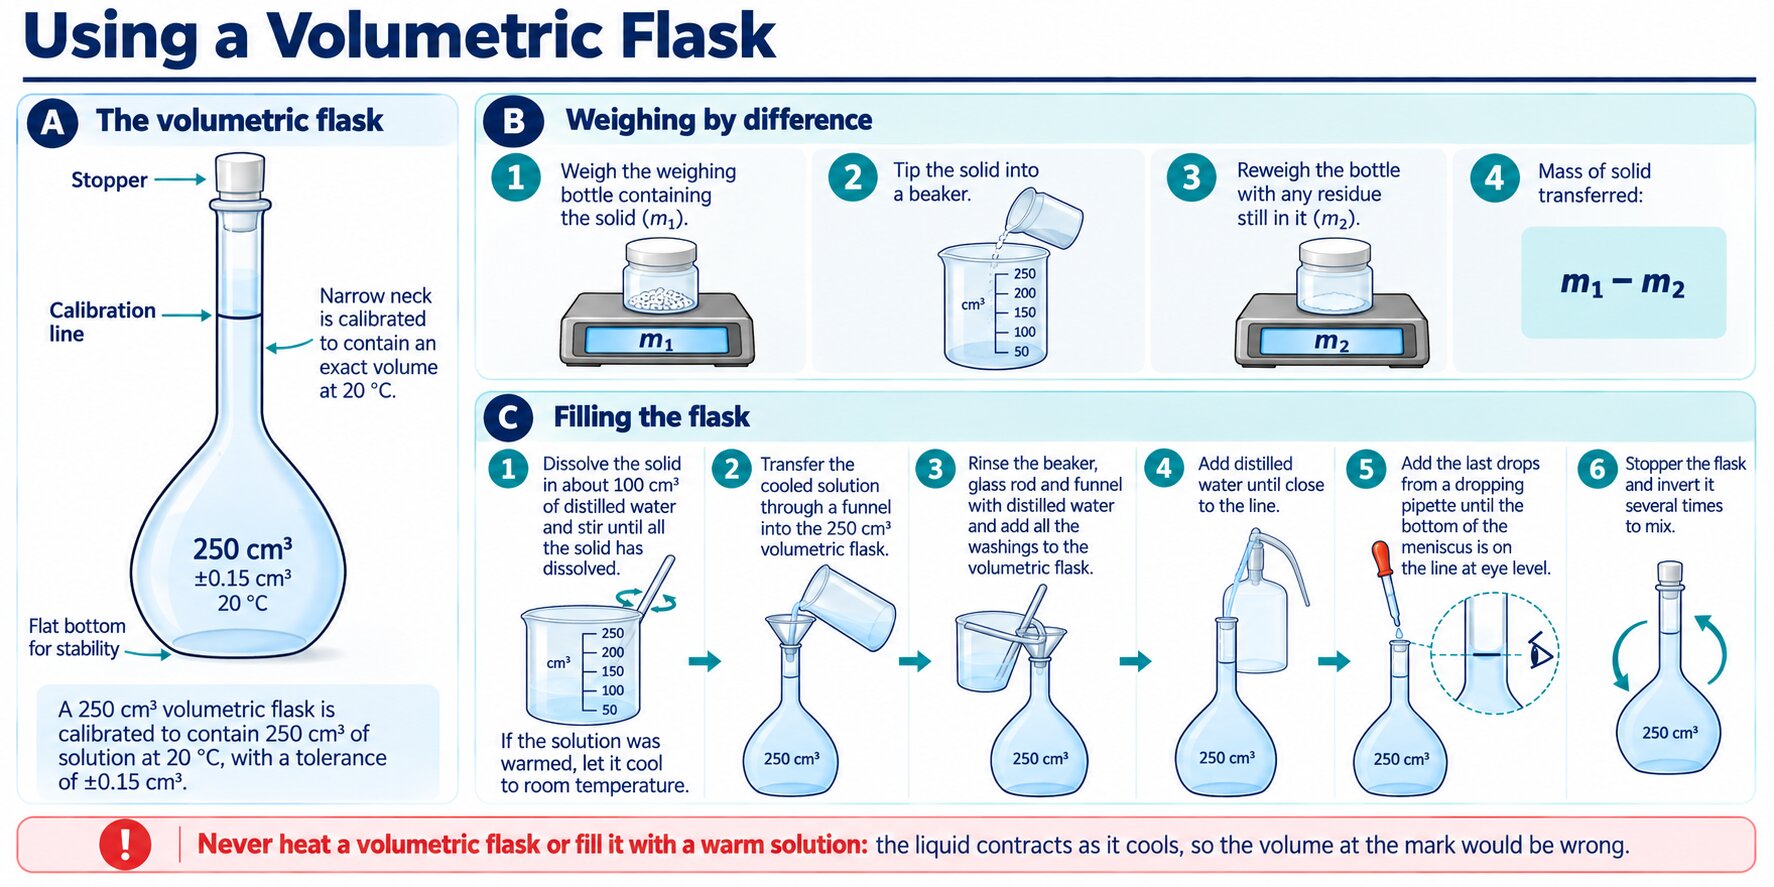
Volumetric flask technique: calibrated to contain 250.0 cm³ at 20 °C, bottom of the meniscus on the line at eye level, cool the solution before filling, stopper and invert to mix.
Exam wording: Say “make up to the mark with distilled water”, never “fill it up”. Say “the bottom of the meniscus on the calibration line at eye level” and, for a warm solution, “the liquid contracts on cooling so the volume falls below the mark”.
Check: Concentration from a Weighing
Turn a pair of weighings and a flask volume into a concentration for a different primary standard, then predict the effect of a lost washing.
Carrying Out the Titration
The sulfamic acid solution goes in the burette; 25.0 cm³ of sodium hydroxide measured with a volumetric pipette goes in the conical flask with 2 to 3 drops of methyl orange.
Methyl orange is yellow in alkali and red in acid, so the flask starts yellow and the end point is the first permanent orange. Going on to red means the end point has been passed and the titre is too large.
Exam tip: The indicator colour change is a certain mark in the practical paper and the live page never gave it; write it out as “yellow to orange”.
Technique points that score: rinse the burette with the acid and the pipette with the alkali; fill the burette below eye level and remove the funnel before reading; make sure the jet below the tap is full of acid.
Read the bottom of the meniscus at eye level and record to 0.05 cm³; stand the flask on a white tile; run a rough titration first.
Near the end point add acid drop by drop with continuous swirling and rinse the sides of the flask with distilled water; repeat until two titres are concordant, within 0.10 cm³ of each other.
Water in the conical flask does not matter: the moles of sodium hydroxide were fixed when 25.0 cm³ was pipetted, and extra water only dilutes them without changing their number.
Water in the pipette or the burette does matter, because it dilutes a solution before its volume is measured.
Common mistake: Students lose marks by drying the conical flask “to be accurate” and by rinsing the pipette with water only.
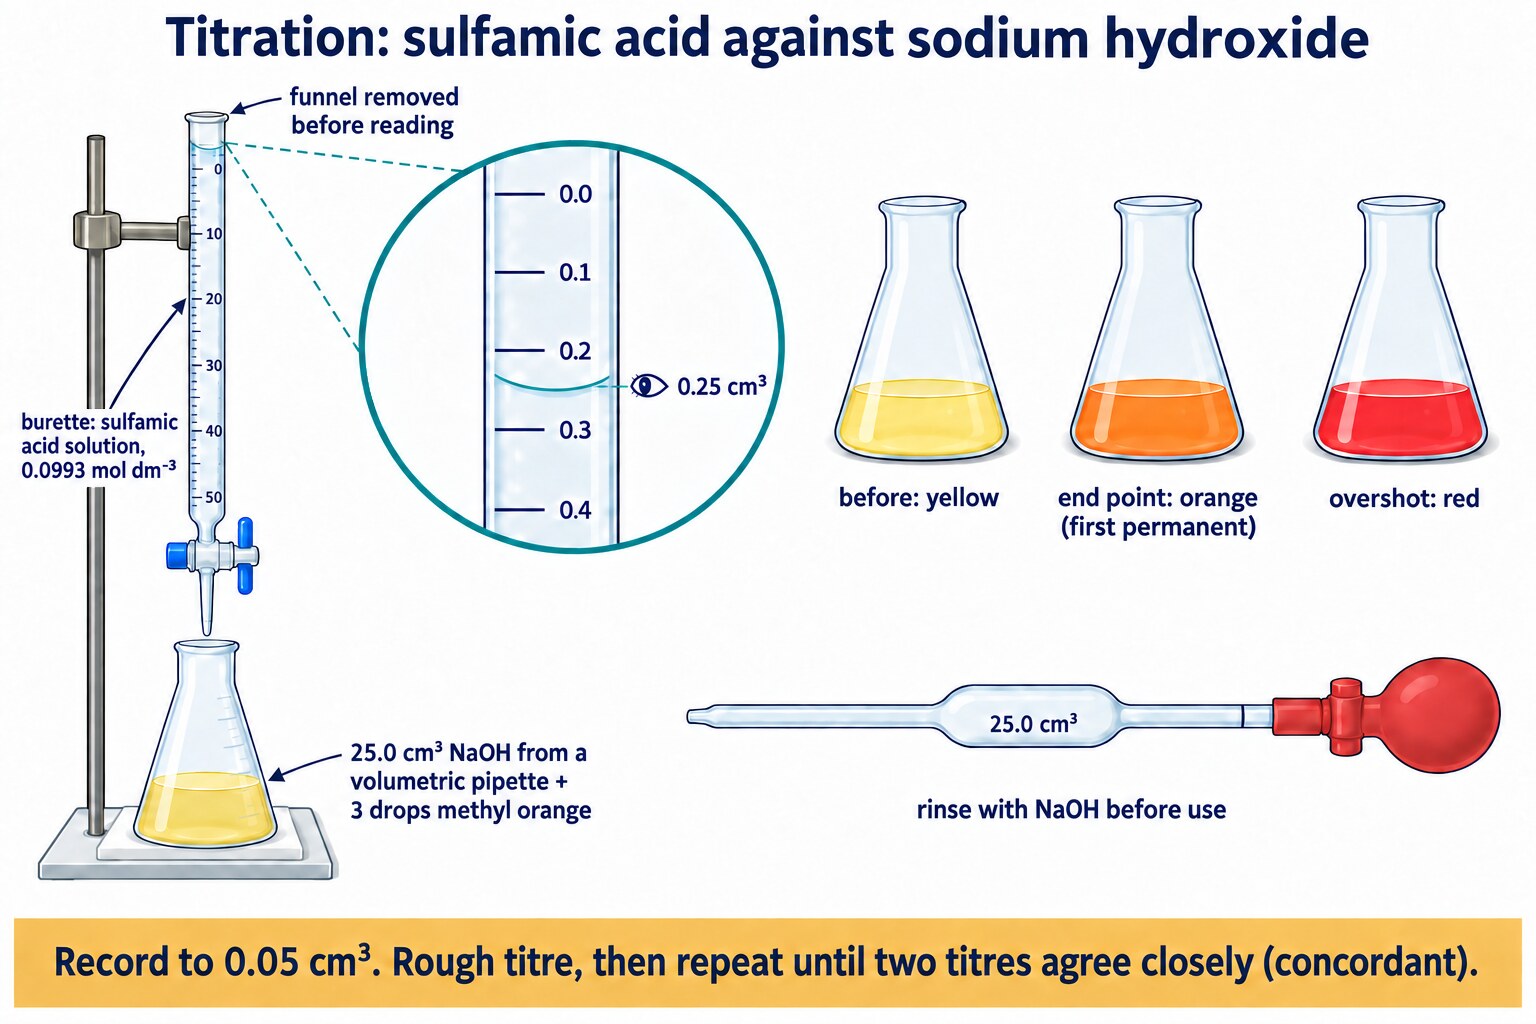
The titration set-up: sulfamic acid in the burette read from the bottom of the meniscus with the funnel removed, 25.0 cm³ of sodium hydroxide and methyl orange in the flask on a white tile, and the yellow, orange and red colour sequence.
Why only 2 to 3 drops: Indicators are weak acids, so each drop reacts with a little of the sodium hydroxide and makes the titre slightly larger; a heavy colour also hides the exact moment the end point is reached.
Check: Indicator Colour Changes
Place the right colours on methyl orange and phenolphthalein titrations run in either direction.
From Burette Readings to Titres
A titre is the volume delivered from the burette: titre = final burette reading − initial burette reading. Every reading is recorded to 0.05 cm³, so titres are quoted to 2 d.p.
The first titration is a rough titre, run quickly to locate the end point; it is labelled as such and is never used in the mean, even if it happens to be close.
Concordant titres are accurate titres that agree within 0.10 cm³ of each other; only those are averaged, and the mean is quoted to 2 d.p.
| Titration | Initial burette reading / cm³ | Final burette reading / cm³ | Titre / cm³ | Used in mean? |
|---|---|---|---|---|
| Rough | 0.25 | 21.00 | 20.75 | No: rough titre |
| 2 | 21.00 | 41.00 | 20.00 | Yes |
| 3 | 0.50 | 20.85 | 20.35 | No: not concordant |
| 4 | 20.85 | 40.95 | 20.10 | Yes |
Mean titre = (20.00 + 20.10) ÷ 2 = 20.05 cm³.
Titre 3 is 0.35 cm³ above titre 2 and 0.25 cm³ above titre 4, so it fails the concordance test on either common rule and is left out.
Common mistake: Students lose marks by averaging all four values (which gives 20.30 cm³) or by treating “concordant” as “identical”: two titres do not have to match exactly, they have to fall within the stated limit.
Exam wording: “Titres 2 and 4 are concordant because they agree within 0.10 cm³ of each other; the rough titre and titre 3 are not used. Mean titre = 20.05 cm³.” Name the titres used and give the mean to 2 d.p.
Check: Reading a Burette Table
Work out the titres from a new set of burette readings, choose the concordant ones and find the mean.
Worked Calculation Ladder
The mass of sulfamic acid is 2.41 g and the mean titre is 20.05 cm³. Every step is shown with its unit, and the unrounded value is carried from step to step.
The final answer is given to 3 significant figures because the mass (2.41 g) and the titres (20.05 cm³, 25.0 cm³) are known to 3 significant figures.
| Step | Working | Result |
|---|---|---|
| 1 Moles of sulfamic acid made | n = m ÷ Mr = 2.41 ÷ 97.1 | 0.02482 mol |
| 2 Concentration of the acid | c = n ÷ V = 0.02482 ÷ 0.2500 dm³ | 0.0993 mol dm⁻³ |
| 3 Moles of acid in the mean titre | n = c × V = 0.0993 × 0.02005 dm³ | 0.001991 mol |
| 4 Mole ratio | H₂NSO₃H(aq) + NaOH(aq) → H₂NSO₃Na(aq) + H₂O(l), so the ratio is 1 : 1 and n(NaOH) = n(acid) | 0.001991 mol |
| 5 Concentration of the alkali | c = n ÷ V = 0.001991 ÷ 0.0250 dm³ | 0.0796 mol dm⁻³ (3 s.f.) |
Two checks on the answer. First, the units: mol ÷ dm³ gives mol dm⁻³ at steps 2 and 5, and mol dm⁻³ × dm³ gives mol at step 3.
Second, the sense: the titre (20.05 cm³) is a little less than the pipette volume (25.0 cm³), so for a 1 : 1 reaction the alkali must be a little less concentrated than the acid, and 0.0796 is indeed a little less than 0.0993.
Common mistake: A student who gets 79.6 or 0.000796 mol dm⁻³ has slipped a factor of 1000 by leaving a volume in cm³.
Exam wording: Write the mole ratio as a line of working with the equation beside it: “H₂NSO₃H : NaOH = 1 : 1, so n(NaOH) = 0.00199 mol”. Asserting the ratio without the equation loses the reasoning mark.
Other Primary Standards
Sulfamic acid is one of several solids that qualify as primary standards, and a question may swap it for another; the technique is identical and only the Mr and the mole ratio change.
Anhydrous sodium carbonate, Na₂CO₃, Mr 106.0, is dried in an oven and cooled in a desiccator before weighing.
It is a base, so it is titrated against an acid such as hydrochloric acid, with methyl orange going from yellow to orange as the acid is added:
Na₂CO₃(aq) + 2HCl(aq) → 2NaCl(aq) + H₂O(l) + CO₂(g)
The ratio is 1 : 2, so the moles of acid in the titre are twice the moles of carbonate in the pipetted portion. Students lose marks by forgetting the factor of 2 and by writing NaCO₃ for the salt.
Potassium hydrogenphthalate, KHC₈H₄O₄, Mr 204.2, is a monoprotic acid with a high Mr, so a weighing of about 5 g gives a small percentage uncertainty.
It is used to standardise sodium hydroxide exactly as sulfamic acid is, with phenolphthalein (colourless to the first permanent pale pink when the alkali is in the burette):
KHC₈H₄O₄(aq) + NaOH(aq) → KNaC₈H₄O₄(aq) + H₂O(l)
| Primary standard | Formula and Mr | Titrated against | Ratio |
|---|---|---|---|
| Sulfamic acid | H₂NSO₃H, 97.1 | Sodium hydroxide | 1 : 1 |
| Anhydrous sodium carbonate | Na₂CO₃, 106.0 | Hydrochloric acid | 1 : 2 (carbonate : acid) |
| Potassium hydrogenphthalate | KHC₈H₄O₄, 204.2 | Sodium hydroxide | 1 : 1 |
Key idea: Whichever solid is used, the ladder is the same five steps. Read the equation for the ratio before step 4, and check whether the standard is the acid or the base so that you know which solution is in the burette.
Errors, Uncertainty and Improvements
The percentage uncertainty of a measurement is (uncertainty ÷ reading) × 100. A mass by difference and a titre each come from two readings, so their uncertainties are doubled before dividing. Using the sample data:
| Measurement | Uncertainty | Working | Percentage uncertainty |
|---|---|---|---|
| Mass of acid, 2.41 g | 2 × ±0.005 g = ±0.01 g | 0.01 ÷ 2.41 × 100 | 0.41 % |
| Titre, 20.05 cm³ | 2 × ±0.05 cm³ = ±0.10 cm³ | 0.10 ÷ 20.05 × 100 | 0.50 % |
| Pipette, 25.0 cm³ | ±0.06 cm³ | 0.06 ÷ 25.0 × 100 | 0.24 % |
| Volumetric flask, 250.0 cm³ | ±0.15 cm³ (class A) | 0.15 ÷ 250.0 × 100 | 0.06 % (0.12 % for a class B flask, ±0.30 cm³) |
| Total | Add the percentages | 0.41 + 0.50 + 0.24 + 0.06 | about 1.2 % |
The burette contributes most, so the improvement that pays is a larger titre: a 50 cm³ pipette of alkali, or a slightly less concentrated acid, roughly halves the burette percentage.
Weighing more solid would reduce the balance term, but 2.4 g already gives under half a percent. The flask and pipette are so precise that swapping them changes little.
Percentage uncertainties are measurement limits, and they are different from the technique errors below, which push the answer in one direction.
| Source of error | Effect on the calculated alkali concentration | Improvement |
|---|---|---|
| Washings not added to the flask | Too high: fewer moles of acid in the flask than calculated, so the acid is weaker and the titre larger | Rinse beaker, rod and funnel and add every rinsing |
| Flask filled above the mark | Too high: acid diluted but 250.0 cm³ still used in the calculation | Finish with a dropping pipette at eye level; start again if overshot |
| Warm solution made up to the mark | Too low: the solution contracts, the volume is below 250 cm³, the acid is stronger than calculated and the titre smaller | Cool to room temperature before transferring |
| Air bubble in the burette jet | Too high: the bubble counts as acid delivered so the titre reads too large | Open the tap to fill the jet before the initial reading |
| Funnel left in the burette | Too low: a drip after the initial reading makes the final reading lower, so the titre is too small | Remove the funnel before every reading |
| Pipette rinsed with water only | Too low: the alkali is diluted so fewer moles are in the flask and the titre is smaller | Rinse the pipette with the alkali |
| Burette rinsed with water only | Too high: the acid is diluted so a larger titre is needed | Rinse the burette with the acid |
| End point overshot to red | Too high: titre too large | Add dropwise near the end point and stop at the first permanent orange |
| Burette read from the top of the meniscus | Small and random: both readings shift together, but inconsistent reading gives scattered titres | Read the bottom of the meniscus at eye level every time |
Exam wording: “The percentage uncertainty in the titre is 0.10 ÷ 20.05 × 100 = 0.50 %. Using a larger volume of alkali would give a larger titre and reduce this.” State the uncertainty, the working and the improvement that reduces it.
Check: A Diprotic Standard
Run a full titration calculation for ethanedioic acid dihydrate, including a 1 : 2 ratio and the titre uncertainty.
Common Mistakes
- Leaving a volume in cm³: divide by 1000 before using c = n ÷ V; an answer of 79.6 mol dm⁻³ for a dilute alkali should ring alarm bells.
- Averaging every titre, including the rough one, or treating only identical titres as concordant.
- Rounding too early: 0.0248 ÷ 0.250 gives 0.0992, while the unrounded 0.02482 gives 0.0993. Carry an extra figure and round once at the end to 3 s.f.
- Weighing the empty bottle first and assuming every grain was transferred; weigh the bottle with the acid, then with the residue.
- Reading the top of the meniscus, leaving the funnel in the burette, or starting with an air bubble in the jet.
- Not swirling, so the end point appears early in one part of the flask, or going on past orange to red.
- Too much indicator: 2 to 3 drops, because the indicator is itself a weak acid that reacts with some of the alkali.
- Drying the conical flask “for accuracy”: water in the flask changes nothing, since the moles of alkali were fixed by the pipette.
- Asserting the 1 : 1 ratio without writing the equation, or applying 1 : 1 to a diprotic acid or a carbonate.
- Quoting 0.079612 mol dm⁻³: five or six significant figures cannot be justified by 3 s.f. data.
Check: What Each Slip Does
In each round, choose the statement that correctly describes the effect of a slip in making or using a standard solution.
Common Exam Points
Say
“Weigh the bottle with the acid, tip it out, reweigh the bottle with any residue: mass used = m₁ − m₂.”
“Rinse the beaker, rod and funnel and add the washings so that all of the acid reaches the flask.”
“Bottom of the meniscus on the line at eye level.” “Methyl orange turns from yellow to orange.”
“Titres concordant within 0.10 cm³ of each other; mean to 2 d.p.; answer to 3 s.f.”
Do not say
“Fill the flask up” (make up to the mark). “Concordant means the same” (within the stated limit). “Heating the flask expands the glass” (the liquid contracts on cooling). “Dry the conical flask” (water there does not matter). “Sulfamic acid : NaOH is 1 : 1” without the equation.
Watch for
Calculation questions that swap the primary standard for a carbonate or a diprotic acid: read the equation for the ratio.
Uncertainty questions: two readings for a mass by difference and for a titre, so double the instrument uncertainty before dividing.
Evaluation questions: say whether the alkali concentration comes out too high or too low, and why.
Related technique on Practical Skills: Titration (concentration of hcl by titration) and, for the same volumetric glassware used in gas work, Practical Skills: Gas Collection (molar volume of a gas).
FAQs
Short answers to the questions Cambridge International examiners ask most often about Practical Skills: Standard Solutions.
Why is sulfamic acid used as the primary standard and not sodium hydroxide?
Sulfamic acid is a pure, stable crystalline solid that does not absorb water or carbon dioxide from the air and has a reasonably high Mr (97.1), so a weighed mass gives its moles directly.
Sodium hydroxide pellets absorb water and carbon dioxide while they are being weighed, so their mass never gives an accurate number of moles; its concentration has to be found by titration against a primary standard.
Why is a volumetric flask used instead of a measuring cylinder?
A 250 cm³ volumetric flask is calibrated to contain exactly 250.0 cm³ at 20 °C when the bottom of the meniscus sits on its single line, with an uncertainty of only ±0.15 cm³ (class A).
A measuring cylinder of the same size has an uncertainty of ±1 cm³ or more, and its wide bore makes the meniscus hard to place.
Why is the burette rinsed with the acid and the pipette with the alkali?
Any water left inside would dilute the solution before its volume is measured.
A diluted acid in the burette gives a titre that is too large; a diluted alkali in the pipette puts fewer moles into the flask and gives a titre that is too small.
Rinsing each with the solution it will hold removes the problem.
What colour change is seen, and when do you stop?
Methyl orange is yellow in the sodium hydroxide and red in acid.
As sulfamic acid is added from the burette the flask stays yellow, flickers orange with swirling near the end point, and the titration stops at the first permanent orange colour.
Red means the end point has been overshot and the titre is too large.
Why is the rough titre not used in the mean?
The rough titre is run quickly to find roughly where the end point is, so the acid is added in large portions and the end point is usually overshot.
It is not an accurate measurement and it is excluded even if it happens to fall close to the accurate titres. Only concordant accurate titres are averaged.
Why does water in the conical flask not matter, when water in the pipette does?
The moles of sodium hydroxide are fixed when 25.0 cm³ is pipetted into the flask; adding water afterwards dilutes them but does not change their number, so the titre is unchanged. Water in the pipette dilutes the alkali before it is measured, so 25.0 cm³ then contains fewer moles.
What happens to the answer if the volumetric flask is filled above the mark?
The acid is more dilute than the calculation assumes, because the student still uses 250.0 cm³. A larger titre is needed to neutralise the 25.0 cm³ of alkali, and the calculated alkali concentration comes out too high. The only remedy is to start the preparation again.
Copyright and author footprint: This OLS revision page was written for Online Learning System by Dr. Mohammed Al-Fatah. It is designed for A Level Chemistry revision and should not be copied or redistributed without permission.
Keep this note — free
Save your progress across every Cambridge topic. A free account remembers which topics you have covered, saves your question scores, and syncs across your phone and laptop.
- Track every topic you have finished
- Keep your practice-question scores
- No payment, no card, free forever
Already registered? Log in